Saturday, July 18, 2015

Happy House-iversary!

Two years ago today we closed on our house! Since then we have:
Painted the kitchen cabinets, replaced the hardware and refinished the counters.
Before

Now


Painted an adorable red accent wall in the kitchen
 but kept the fruit bowl light (for now...)

Found this gem for our kitchen appliance and repainted it


Painted a chalkboard on the side of our fridge.

Refinished our living room coffee table and end table.

Recovered this chair.


Made these curtains


Swapped gold fixtures for oil rubbed bronze 
and spray painted the shower stall in the master bathroom.

Painted the master bathroom and bedroom and stenciled this accent wall.

Took down this death trap patio cover.

Built a coffee table for the game room out of pallets.

Installed a penny floor in the half bath and painted it teal.

Had the front door and shutters painted from blue to red and grey-brown


And got a new fence and a new roof.


It's kind of exhausting, but I love our house and I'm ready for the next project
 and Matt is eager to help : )

Friday, January 3, 2014

Pallet Coffee Table

It all started with a pile of pallets I picked up on the side of the road (say that five times fast)... I used the top two for this project because there were in the best condition and the same size. Didn't really have a plan when I started. Just wanted to make a coffee table for our game room. (Freckles was very helpful!)
I used white paint left over from my kitchen cabinets. I put one coat everywhere, I tried to get all the surfaces even if you wouldn't be able to see them since this is unfinished wood and felt kinda dirty... After painted I sanded to make it distressed and to make sure the areas you would touch when its done were smooth (the sides and the outside areas of the top).Then I stenciled these details and stripes in red, and sanded back over them.WEAR A MASK! Especially when sanding over paint, you will feel sick the next day if you don't, trust me.
I painted the bottom and sides of the other pallet with red paint I had left over from an accent wall. This paint was really cheap and took 4 coats to cover the wall but I love how it turned out here. The wood grain and even some numbers on the side show through the paint. Then I sanded it lightly again to look distressed.
For the top I sanded A LOT! I wanted it to be perfectly smooth. Then I put three coats of stain to make it pretty dark and three coats of sealant so I wouldn't have to stress about coasters. (Seems a little silly to insist on coasters to protect a pallet...) I also sealed over the red and white paint just to be safe.
The table needed to be about 20 inches tall so I got these 6 inch blocks cut at Home Depot from a 4x4 piece of pine (about $13). Then just sand and stain like the top of the table. Then I used wood glue and "L" brackets to attach the blocks. It gets a little tricky for the second pallet since the drill can't reach all the angles. I had to mark where all the brackets went, the drill them in to the pallet separately then put it together and drill into the blocks. 
The casters were the most expensive part (about $9 each at Home Depot). I like the industrial look they give it plus they have red wheels! They were shiny silver so I painted them the my trusty Rustoleum spray paint. 
I LOVE how it turned out! We had friends over last night and broke the table in with a football game, dinner, drinks and even a few cards games. It was perfect : ) 

Sunday, October 13, 2013

Penny Floor!!


How to create a penny floor:

1. Gather pennies... I mean really get A LOT of pennies. We hit up friends and family for pennies, they were happy to get rid of them and we were happy to take them. We got about 2000 pennies this way. Then go the bank and ask for more, they will either be excited about your project or look at you like you are crazy. FYI you cannot get rolls or new pennies from the bank. I went to several branches and they said they come in mixed. According to the teller you can order them online. That seems like too much work and the mix of new and old pennies turned out great! We used about 6300 pennies. I figured it to be $2.88/sq ft, just in pennies.

You can clean the pennies in a mixture of 1/4 cup vinegar and 1 teaspoon salt to make them SHINE! It works like magic : ) I did this to a few hundred pennies.

Loctite Polyseamseal 10 fl.-oz. Almond All Purpose Adhesive Caulk


2. Caulk - my husband sealed below the baseboards and around the sink and toilet with this Loctite All Purpose Caulk. This is to keep the epoxy from sticking to everything. We needed four tubes but we had a huge gap between the baseboard and the floor.
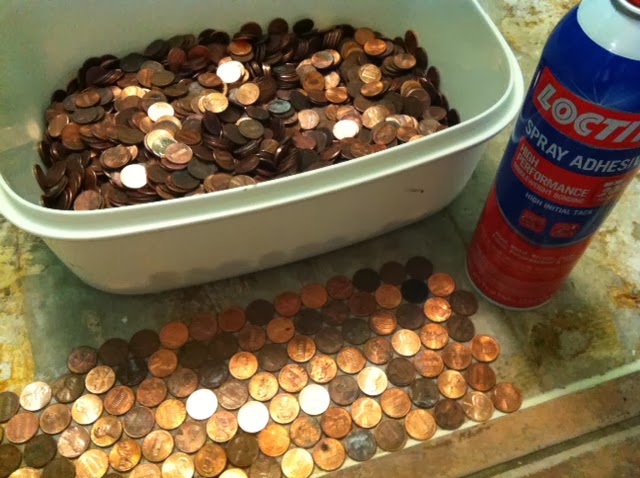
3. Glue! I used this Loctite  Spray Adhesive and it worked wonderfully! Just spray a small section and put the pennies down. I put them as close together as I could and I started from the doorway, which gave me a nice straight line to work off. Mine are placed randomly, I just tried not to have too many shiny ones or too many dull ones together.


4. Keep Gluing! Here is my progress about every hour or so, I'd work about 45 min then take a break. I also wiped them with a damp towel after the adhesive dried to clean any that came up between the pennies.


5. Epoxy - We bought this Epoxy "Super Glaze" at Home Depot. We used two of them, probably could have used 3 but it was kind of expensive. Make sure the floor is clean clean clean. We have two big dogs, keeping dog hair out of it was a challenge. Just followed the instructions on the box. Definitely a two person job, you have to mix it for six minutes. Then just poured it on the floor starting behind the toilet and sink and working towards the door. I used a plastic putty scrapper to smooth it out and make sure it got all the way to the edges.
6. Done! - Here is the finished product:


There are a couple of unique pennies in the mix. Kinda fun to challenge people to find them. There are 2 Canadian pennies and 3 of these old really old pennies that just say "ONE CENT" on the back.
 
Before and After. I love the teal!